Generating TSP art from a stippled image
<<< Producing a stippled image with Gimp || Generating TSP art from a stippled image || Advanced stippling >>>
Contents
Preliminaries[edit]
At this point, you should have a PBM file containing the stippling information for the image you are working with. Without this information, you cannot proceed. The article
provides step by step directions showing you how to stipple an image and produce a PBM file with the stippling information.
Furthermore, you must already have installed or built a copy of Concorde TSP's linkern executable. For directions, please see
You will also need to know how to open a command window on your computer (aka, a terminal window). That's second nature for Linux users. Windows and Mac users can refer to the sections below with notes for their platforms.
Finally, you need to obtain the latest versions of the following three files,
- tspart.py
- tspbitcity.py
- tspsolution.py
These three files are hosted at the Eggbot repository,
Download the lastest version of the tsp_art_tools zip file, tsp_art_tools_x_y.zip. After you unzip that file, you will see those three files within it. Copy those files to a convenient work directory.
Getting to work[edit]
For best results with a fine point Sharpie pen, you do not want too much detail. Try to start with an image which has around 2000 or 3000 stipples. With too much detail, you will need a very fine point on your Eggbot's pen. You can get a simple report of the number of stipples in an input file using the --count switch to tspart.py. However, that's getting a bit ahead of ourselves.
To generate TSP art from a PBM file, just move to the directory with the tspart.py and other two .py files. Then, from a command window on Linux or Macs, issue the command
- % python tspart.py input-file
where input-file is the name of your PBM file. On Windows, the command needs to be issued from the directory containing the inkscape.exe file and takes the form
- C:\Program Files\inkscape\> python\python tspart.py input-file
See the Windows section below for addition details.
Once you've entered the correct command and pressed return, tspart.py will begin running, providing updates on its progress. On Macs and Linux machines, there will be a lot of output from the linkern solver as well. When tspart.py is done, it should produce output similar to that shown below,
- % python tspart.py zebra.pbm
- ...
- Solver finished successfully
- Loading solver results from zebra.tour ... done
- Writing SVG file zebra.svg ... done
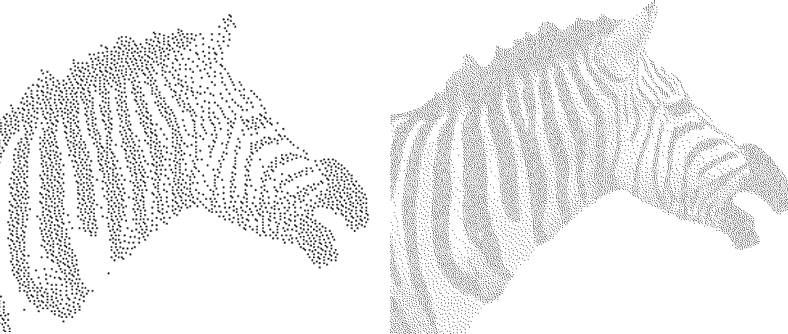
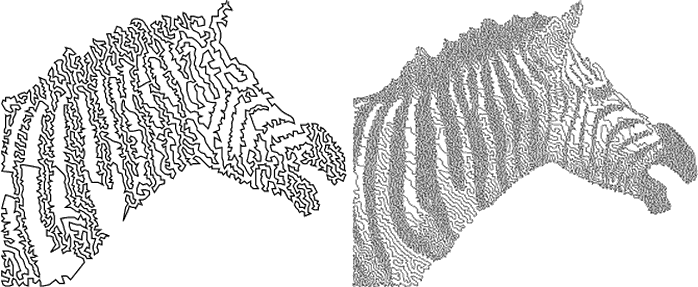
When tspart.py has finished, look at the resulting SVG file with Inkscape! The two SVG files shown below used approximately 3,200 and 16,000 stipples. They correspond to the stippled images shown at the top of this page.
Additional options to tspart.py[edit]
To obtain a count of the number of stipples in a PBM file, use the --count option,
- % python tspart.py --count zebra.pbm
- Loading bitmap file ../zebra.pbm ... done; 3201 stipples
Note that tspart.py will exit after displaying the count: it does not then generate a TSP solution.
When running the linkern solver, tspart.py tells linkern to do three successive runs over the data. Each run refines the results of the prior run. You can control the number of runs with the --runs option. For example,
- % python tspart.py --runs=1 zebra.pbm
With fewer runs, the solver will complete its job faster. And, you may not be able to tell much difference between more and fewer runs: the refinements are often not that different visually.
Use the --max-segments option to limit the number of line segements per SVG path element. Some SVG viewers may not like extremely long paths -- paths made up of thousands of line segments. By default, tspart.py ensures that no single path has more than 400 line segments in it. If your SVG file viewer needs, for example, paths of 250 or less line segments, then specify
- % python tspart.py --max-segments=250 zebra.pbm
On the other hand, if you want a single, closed path drawn then specify --max-segments=0. Using a value of zero tells tspart.py to put the entire TSP solution into a single SVG path. Of course, your SVG viewer needs to be able to handle the single path which results, even if it has thousands or tens of thousands of line segments.
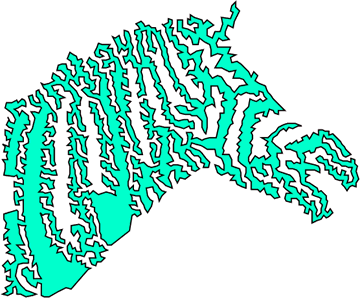
When using --max-segments=0, you can also specify a fill color. By default, the closed path has an SVG fill value of "none". You can select any SVG color name (e.g., blue, red, orange, etc.), or you can specify hexadecimal RGB values using the #rrggbb notation (e.g., #ff0000 for red). For example, the command
- % python tspart.py --max-segments=0 --fill=#00ffcc --runs=1 zebra.pbm
produced the result,
To obtain a listing of all of tspart.py's options, use the --help option,
- % python tspart.py --help
| Option | Description |
|---|---|
| -c, --count | Report the number of stipples (black pixels) in the input bitmap file and then exit. |
| -f color, --fill=color | Color to fill the enclosed TSP tour with. May be any recognized SVG color keyword names or other color data type specification permitted by the SVG specification. E.g., "red", "blue", "purple", "#00ff00", etc.). 'NOTE: --max-segments=0 must also be specified in order to use this option. |
| -h, --help | Display help information and then exit. |
| -L name, --layer=name | Place the SVG output into an Inkscape layer with the specified name. For use with the Eggbot extension, use names starting with numbers; e.g., "1 - black", "2 - magenta", "3 - cyan", etc. That then allows using the Eggbot control extension's ability to plot a single layer at a time. |
| -m n, --max-segments=n | Each SVG <path> produced is composed of many connected line segments. Some SVG viewers may be limited in the number of line segments per path which they can display. For this reason, tspart.py normally breaks a TSP tour into several paths, each path containing at most 400 line segments. You can increase or decrease this limit with this option. To allow an unlimited number of line segments in a path, specify --max_segments=0. When a value of 0 is given, tspart.py will generate a result which is a single, closed path and which therefore can be filled using the --fill option. |
| --mid, --post, --pre | When producing color TSP art, it is useful to generate partial SVG output files. SVG files have a section which only appears at the start of the file which we refer to as the "preamble" or "header". They also have a closing section which appears only at the end of the file which we refer to as a "postable" or "footer". Sections of the file in the middle do not have either a preamble or postamble. With this option, partial SVG output containing the preamble (--pre), the postamble (--post), or neither (--mid) can be generated. See the discussion on color TSP art for examples showing the use of these options. |
| -r n, --runs=n | By default, the linkern solver is iteratively run three times (--runs=3). Each successive run refines the results of the prior run. When generating TSP art for large numbers of stipples (e.g., 25,000 or more), consider using fewer runs so as to speed up the solution process. |
| -s color, --stroke=color | By default, the TSP solution is drawn using a black line (--stroke=black). A different stroke color may be specified with this option. The permitted color names are the same as for the --fill option described above. |
| -S exe-path, --solver=exe-path | tspart.py needs to know where the linkern solver is installed in order to run it. Use this option to specify the correct location in the event that tspart.py's builtin default is not correct for your system. |
Notes for Windows users[edit]
The script tspart.py is a Python script. Python is a programming language that is not normally installed with Windows. However, having installed Inkscape, you now have a copy of Python. (If you have not yet installed Inkscape, then please refer to the instructions for installing Eggbot software for assistance.) To run tspart.py, you will need to open a command window. If you are unfamiliar with how to do this, please see the Windows section of
for directions on how to do so on Windows XP.
Once you have an open command window, navigate to the directory containing the Inkscape executable, inkscape.exe. This will usually be C:\Program Files\Inkscape.
- C:\Documents and Settings\Judy User>cd C:\Program Files\inkscape
- C:\Program Files\inkscape>
Note that if you have installed Inkscape on a drive other than C:, you first need to move to that drive letter. For example, if Inkscape is installed on drive E:, use the commands
- C:\Documents and Settings\Judy User>E:
- E:\>cd E:\Program Files\inkscape
- E:\Program Files\inkscape>
Once in that directory, the Python program should be in the python subdirectory. However, you must run that program from the Inkscape directory. To run tspart.py, issue the command
- C:\Program Files\inkscape> python\python C:\tspart.py C:\image.pbm
In the above command, it is assumed that tspart.py, tspbitcity.py, tspsolution.py, and image.pbm are all in the top-level directory of the C: drive. Be sure to give the correct path to those files. You may also need to use --solver option to specify the path to the linkern solver executable. By default, tspart.py assumes that the executable is the fle C:\linkern.exe.
Notes for Mac users[edit]
To open a command window -- a terminal window -- on a Mac, use the Terminal app located in the Utilities folder. The Utilities folder is located in your Applications folder. But, you knew this already since you built Concorde TSP first, right?
<<< Producing a stippled image with Gimp || Generating TSP art from a stippled image || Advanced stippling >>>